Mobile Testing with Appium
This page provides step-by-step instructions for installing mobile testing with Appium to enable iOS mobile device testing through Provar.
Requirements Mobile Testing with Appium
You will need the following:
- An iPad or iPhone (referred to as iPad below) with iOS 10 or later
- A MacBook or iMac (referred to as MacBook below) with:
- At least 4GB of memory
- macOS High Sierra or later installed*
- Xcode 9 or later installed on the MacBook*
- Patched version of Appium Desktop 1.6.2 or later installed on the MacBook
- Developer signed build of the application’s .ipa file for Native or Hybrid app testing**
*Earlier versions may work but have not been tested. ** Provar can assist in providing appropriately signed .ipa files on request.
Installing XCode
Open the App Store application on the MacBook (not iPad). Search for and install (or update) XCode version 9 or later.
Installing Appium Desktop
- On the MacBook, download Appium Desktop from here. This is the standard Appium Desktop 1.6.2 distribution with a patch for a known bug.
- Unzip the file and move it into your Applications folder.
- Open the Appium application and then close it.
- Open a terminal window and execute the following commands (it will ask for your password):
sudo chmod -R 777 /Applications/Appium.app
cd /Applications/Appium.app/Contents/Resources/app/node_modules/appium/node_modules/appium-xcuitest-driver/WebDriverAgent
sudo ./Scripts/bootstrap.sh
Getting iPad device ID and installing an application
Plug the iPad into the MacBook via a USB lead.
Then launch XCode on the MacBook and open the Devices and Simulators window (main menu > Window > Devices and Simulators)
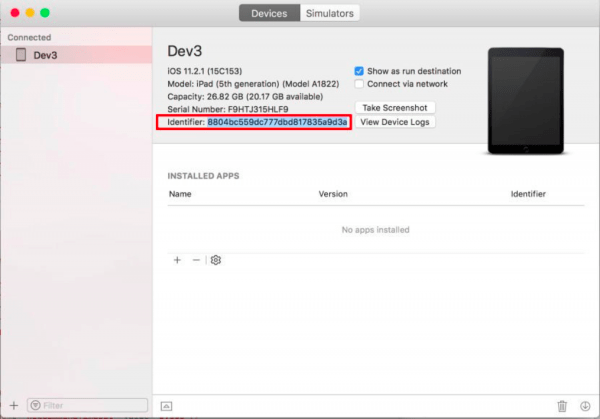
Locate the iPad under the Devices tab and make a note of its “identifier” by right-clicking it, choosing Copy, and then pasting somewhere:
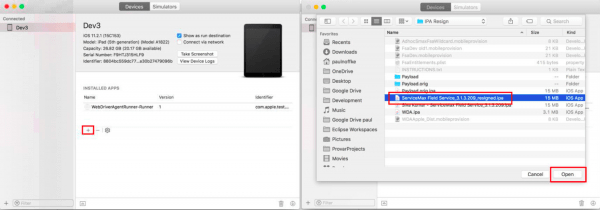
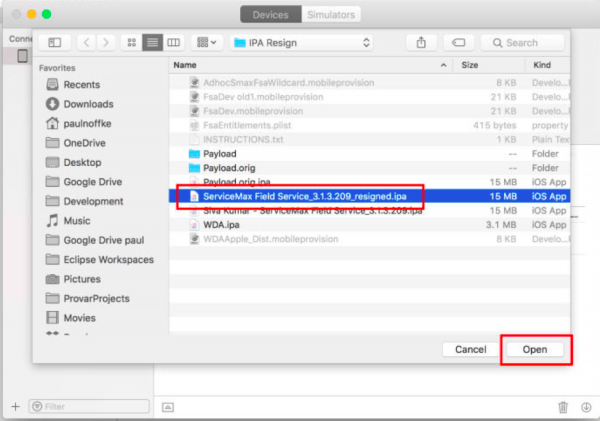
In the same window, click the + button beneath INSTALLED APPS and choose the .ipa file for the application from the file dialog (scroll down for larger screenshots):

Wait while the application is installed on the device and appears in the INSTALLED APPS list:
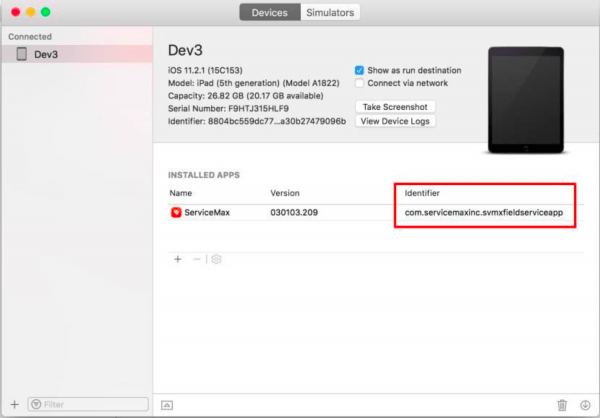
Then take note of the newly installed application’s Identifier.
Setting Up Web Driver Agent Signing
Appium automatically builds and installs the WebDriverAgent app on your iPad. This must be signed with your Apple developer account (or the one supplied by Provar Support) before you can create or run tests for each device.
First, Navigate to the following folder on your MacBook (using Finder):
/Applications/Appium.app/Contents/Resources/app/node_modules/appium/node_modules/a ppium-xcuitest-driver/WebDriverAgent
/Applications/Appium.app/Contents/Resources/app/node_modules/appium/node_modules/a ppium-xcuitest-driver/WebDriverAgent
Note: You can press CMD+Shift+G inside Finder to open the “Go to the folder” dialog and paste the above value.
Then double-click on the “WebDriverAgent.xcodeproj” file. This will open in XCode.
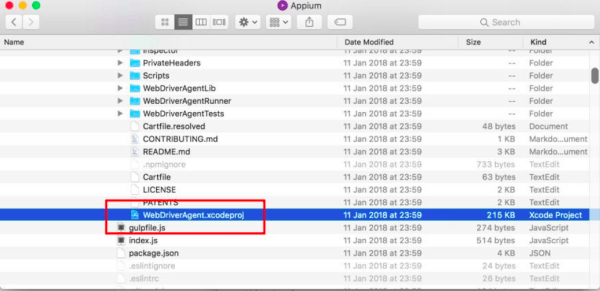
In XCode, select the iPad in the dropdown towards the left of the toolbar:

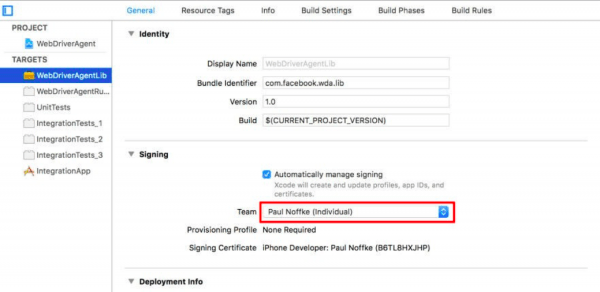
Choose WebDriverAgent in the Project Navigator on the left and then choose WebDriverAgentLib under the TARGETS:
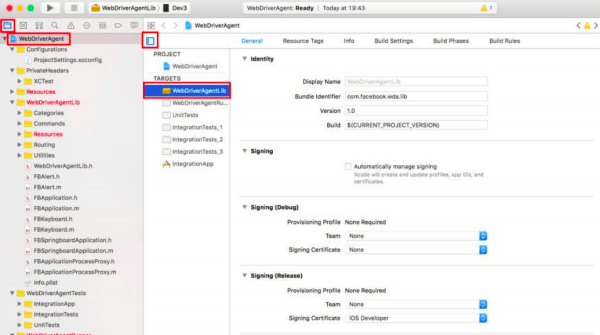
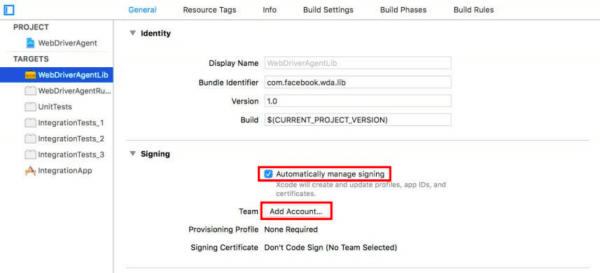
Check the “Automatically manage signing” checkbox, accept the dialog, and then click on “Add Account…”:
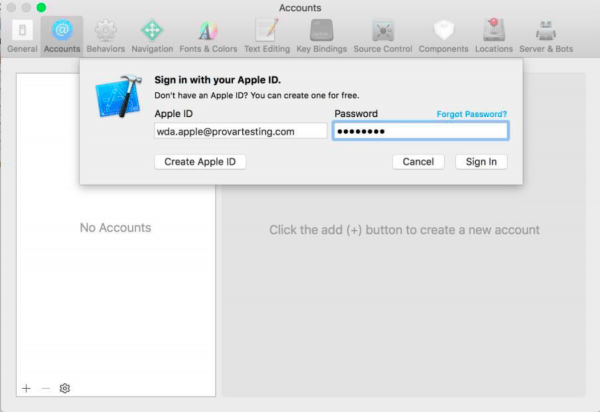
Sign in with your Apple developer account or the credentials supplied to you by Provar Support:
Close the resulting Account details page:
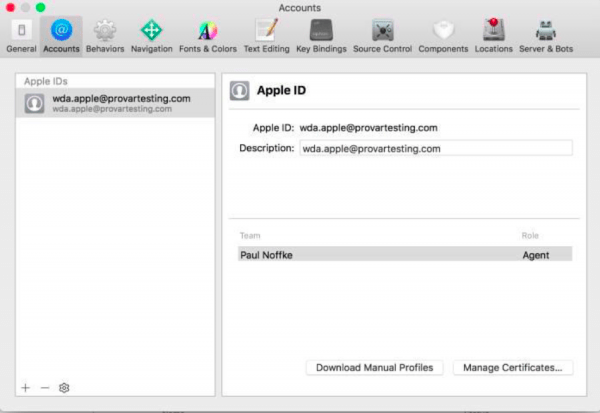
Choose the newly added account in the Team dropdown:
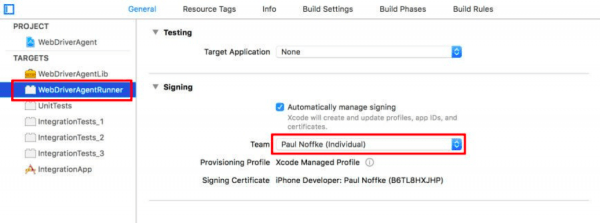
Choose the remaining entries under the TARGETS list (WebDriverAgentRunner, UnitTests, etc.) and choose the same account in the Team dropdown for each one:
You can leave XCode running and proceed to the next steps.
Installing Appium Prerequisites
On the MacBook, open a Terminal window and run the following commands.
To install brew:
/usr/bin/ruby -e “$(curl -fsSL https://raw.githubusercontent.com/Homebrew/install/master/install)”
For XCode selection:
sudo xcode-select –reset
sudo xcode-select –switch /Applications/Xcode.app
To install libimobiledevice:
brew install –HEAD libimobiledevice
To install node/npm:
Download and install node.js from here: https://nodejs.org/en/download/
To install ios-deploy:
sudo npm install -g ios-deploy –unsafe-perm=true
To install Carthage:
brew install carthage
To install ios-webkit-debug-proxy:
brew unlink ios-webkit-debug-proxy
brew install ios-webkit-debug-proxy
brew link ios-webkit-debug-proxy
Enabling the Web Inspector on the iPad
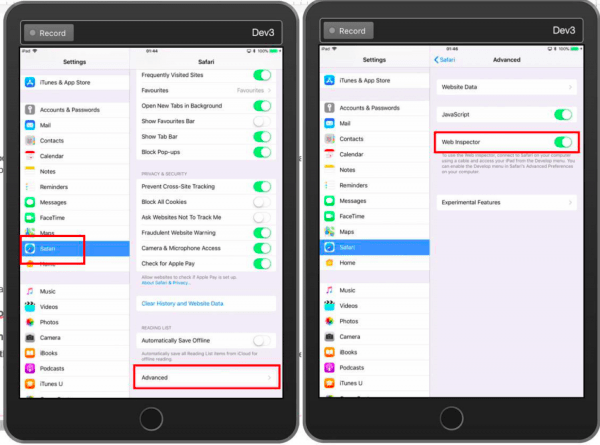
On the iPad, launch the Settings app and choose Safari on the left. Scroll to the bottom on the right and choose Advanced. Then enable the Web Inspector setting:
Testing for 1 iPad
Start Appium from LaunchPad.
ServiceMax FSA Mobile Testing
Suppose you have completed these steps as a part of the setup for ServiceMax FSA Mobile Testing. In that case, you can proceed to the ServiceMax-specific setup steps described on the ServiceMax FSA Mobile Testing page.
Troubleshooting
This section lists known installation issues with Appium and provides steps to fix them.
Failed to Install FSA App on iPad
Symptom: Get installation failure and install the ServiceMax .ipa file via the Devices and Simulators window in XCode.
Cause 1: Device not Provisioned
Apple requires that your iPad’s device ID is added to the .ipa file’s provisioning profile. Please contact Provar support to confirm that your device is listed.
Cause 2: The application is already installed
If you already have ServiceMax installed on your iPad, uninstall it and try again.
Install of iOS-Deploy fails
Symptom:
/bin/sh -c /usr/local/lib/node_modules/ios-deploy/build/ios-deploy.build/Release/ios-deploy.build/Script-C0CD3D981F59D20100F954DB.sh cp: /System/Library/PrivateFrameworks/MobileDevice.framework/XPCServices: No such file or directory ** BUILD FAILED **
Solution:
See the detailed steps posted by raydrogers here: https://github.com/ios-control/ios-deploy/issues/346.
Could not Connect to lockdownd. Exiting.: Permission Denied
Symptom:
The above message appears in the Appium log files
Solution:
Run the following commands from a terminal window:
chmod +x /var/db/lockdown
brew update
brew upgrade ios-webkit-debug-proxy
as
Running Salesforce Mobile Tests
Once the Appium server setup is complete, you can run Provar mobile tests in Run or Debug mode.
Before starting execution, make sure the Appium Server is up and running:
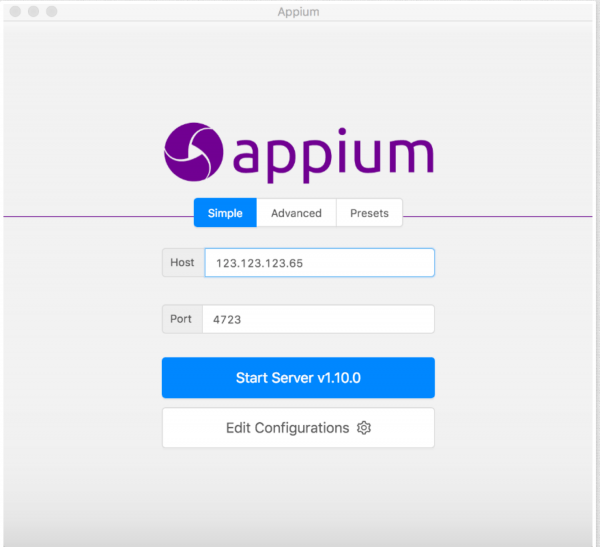
Make sure the Appium Server details are configured in Provar under the Browser Providers section:


Before clicking ‘Run’ or ‘Debug,’ this Web Browser should be selected in the Web Browser dropdown in the top-right corner of Provar Desktop:
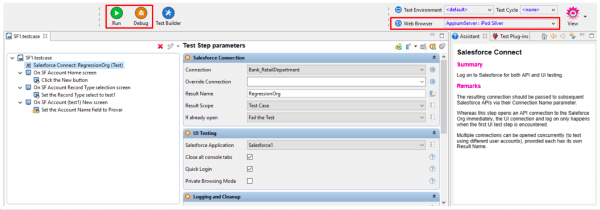
It should display as follows:
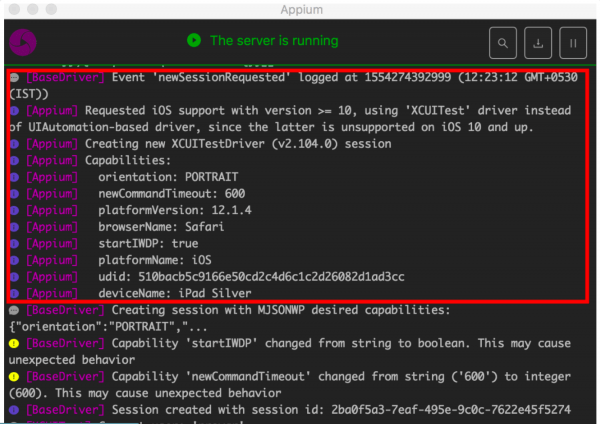
Below is an example test running:
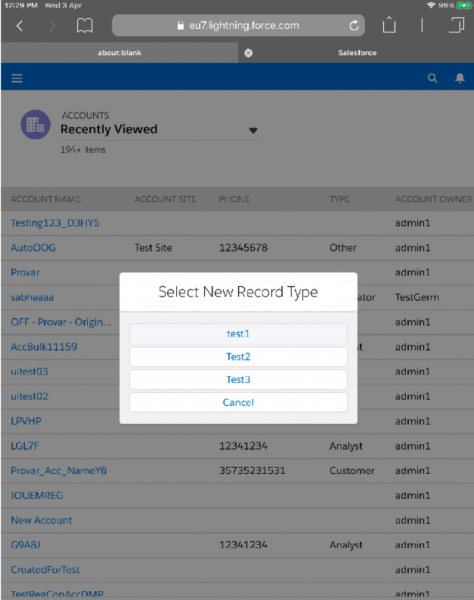
And in Test Runner:

- Provar Automation
- Installing Provar Automation
- Updating Provar Automation
- Using Provar Automation
- API Testing
- Behavior-Driven Development
- Creating and Importing Projects
- Creating Test Cases
- Custom Table Mapping
- Functions
- Debugging Tests
- Defining a Namespace Prefix on a Connection
- Defining Proxy Settings
- Environment Management
- Exporting Test Cases into a PDF
- Exporting Test Projects
- Override Auto-Retry for Test Step
- Managing Test Steps
- Namespace Org Testing
- NitroX
- Provar Automation
- Provar Test Builder
- Refresh and Recompile
- Reintroduction of CLI License Check
- Reload Org Cache
- Reporting
- Running Tests
- Searching Provar with Find Usages
- Secrets Management and Encryption
- Setup and Teardown Test Cases
- Tags and Service Level Agreements (SLAs)
- Test Cycles
- Test Plans
- Testing Browser Options
- Tooltip Testing
- Using the Test Palette
- Using Custom APIs
- Callable Tests
- Data-Driven Testing
- Page Objects
- Block Locator Strategies
- Introduction to XPaths
- Creating an XPath
- JavaScript Locator Support
- Label Locator Strategies
- Maintaining Page Objects
- Mapping Non-Salesforce fields
- Page Object Operations
- ProvarX™
- Refresh and Reselect Field Locators in Test Builder
- Using Java Method Annotations for Custom Objects
- Applications Testing
- Provar Manager
- How to Use Provar Manager
- Provar Manager Setup
- Provar Manager Integrations
- Release Management
- Test Management
- Test Operations
- Provar Manager and Provar Automation
- Setting Up a Connection to Provar Manager
- Object Mapping Between Automation and Manager
- How to Upload Test Plans, Test Plan Folders, Test Plan Instances, and Test Cases
- Provar Manager Filters
- Uploading Callable Test Cases in Provar Manager
- Uploading Test Steps in Provar Manager
- How to Know if a File in Automation is Linked in Test Manager
- Test Execution Reporting
- Metadata Coverage with Manager
- Provar Grid
- DevOps
- Introduction to Provar DevOps
- Introduction to Test Scheduling
- Apache Ant
- Configuration for Sending Emails via the Automation Command Line Interface
- Continuous Integration
- AutoRABIT Salesforce DevOps in Provar Test
- Azure DevOps
- Running a Provar CI Task in Azure DevOps Pipelines
- Configuring the Automation secrets password in Microsoft Azure Pipelines
- Parallel Execution in Microsoft Azure Pipelines using Multiple build.xml Files
- Parallel Execution in Microsoft Azure Pipelines using Targets
- Parallel execution in Microsoft Azure Pipelines using Test Plans
- Bitbucket Pipelines
- CircleCI
- Copado
- Docker
- Flosum
- Gearset
- GitHub Actions
- Integrating GitHub Actions CI to Run Automation CI Task
- Remote Trigger in GitHub Actions
- Parameterization using Environment Variables in GitHub Actions
- Parallel Execution in GitHub Actions using Multiple build.xml Files
- Parallel Execution in GitHub Actions using Targets
- Parallel Execution in GitHub Actions using Test Plan
- Parallel Execution in GitHub Actions using Job Matrix
- GitLab Continuous Integration
- Travis CI
- Jenkins
- Execution Environment Security Configuration
- Provar Jenkins Plugin
- Parallel Execution
- Running Provar on Linux
- Reporting
- Salesforce DX
- Git
- Team Foundation Server
- Version Control
- Masking Provar Credentials on CI
- Salesforce Testing
- Best Practices
- Salesforce Connection Best Practices
- Improve Your Metadata Performance
- Testing Best Practices
- Automation Planning
- Supported Testing Phases
- Provar Naming Standards
- Test Case Design
- Create records via API
- Avoid using static values
- Abort Unused Test Sessions/Runs
- Avoid Metadata performance issues
- Increase auto-retry waits for steps using a global variable
- Create different page objects for different pages
- The Best Ways to Change Callable Test Case Locations
- Working with the .testProject file and .secrets file
- Best practices for the .provarCaches folder
- Best practices for .pageObject files
- Troubleshooting
- How to Use Keytool Command for Importing Certificates
- Browsers
- Configurations and Permissions
- Connections
- DevOps
- Error Messages
- Provar Manager 3.0 Install Error Resolution
- Provar Manager Test Case Upload Resolution
- Administrator has Blocked Access to Client
- JavascriptException: Javascript Error
- macOS Big Sur Upgrade
- Resolving Failed to Create ChromeDriver Error
- Resolving Jenkins License Missing Error
- Resolving Metadata Timeout Errors
- Test Execution Fails – Firefox Not Installed
- Selenium 4 Upgrade
- Licensing, Installation and Firewalls
- Memory
- Test Builder and Test Cases
- Release Notes