Git and Automation Projects
Once the Git plugin is installed, you will need an Automation Project to work on.
This can be done in various ways:
- By importing a Automation Project from an existing local repository
- By cloning from an existing Project stored in Git
- By creating a Project locally and linking it to Git
Select one of these options to get started.
Once you have your Project sorted, refer to Working with Git for more best practices on using Git with Provar.
Option 1: Importing a project from an existing local repository
To import a Project from an existing local repository, first ensure that you already have the relevant repository in your local file system and know its location. This could be done by cloning the repository in advance, creating it from scratch or copying it from another location.
Click Import from File on the Welcome to Provar screen.

This will display the Select Repository Source screen. Select Existing local repository. Click Next.
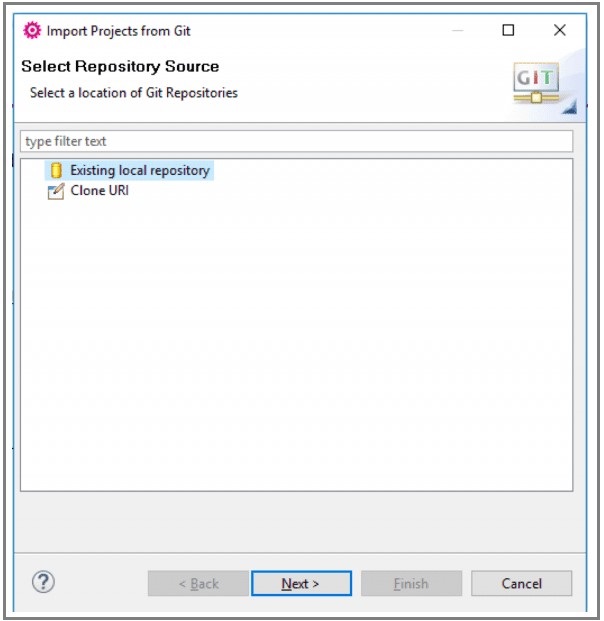
On the next screen, specify a directory and click Search to trigger a scan for Git repositories contained in that directory.
If Git repositories are found, they will be listed, and you can select one or more to add.

Select the desired repository, then click Finish.
On the next screen, select the desired import process. The default option, Import existing Eclipse projects, is recommended.
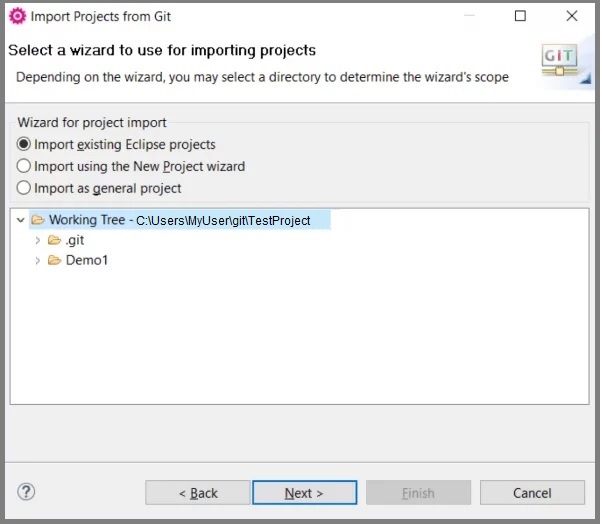
Click Next.
The next screen will display the available Test Projects in the repository.

Click Finish to import the selected Test Project into the workspace.
Option 2: Cloning a Project from Git
Cloning a remote repository will copy a repository from Git to your local file system.
To clone a remote repository, first, click Import from File on the Welcome to Provar screen.

Then, select Clone URI and click Next.
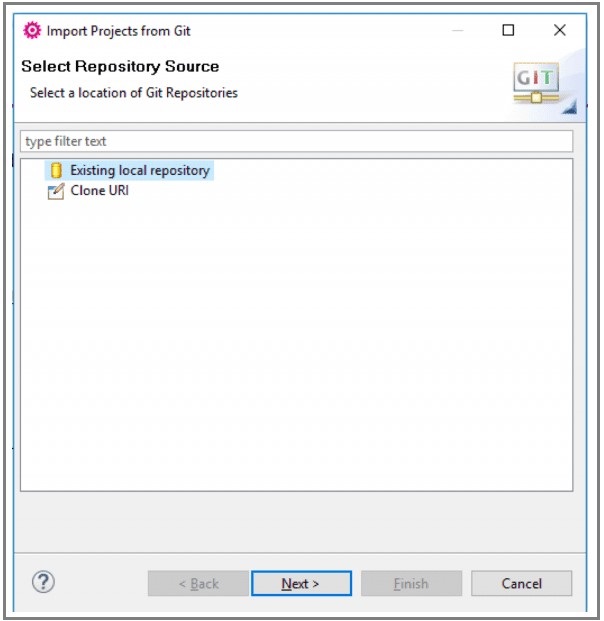
The following screen will be displayed.

Enter the information as follows:
- URI: The complete URI of the remote repository or the path on the file system. This field is automatically synchronized with the other fields.
- Host: The name of the remote host
- Repository Path: Path to the remote repository
- Protocol: The following Protocols are supported:
- file: File system access to the repository
- ftp: File Transfer Protocol
- git: The most efficient built-in git protocol (default port 9418). This protocol doesn’t provide authentication. Typically used for anonymous read access to the repository
- http: Hypertext Transfer Protocol can be tunneled through firewalls
- https: Hypertext Transfer Protocol Secure can be tunneled through firewalls
- sftp: SSH File Transfer Protocol
- ssh: Git over secure shell (SSH) protocol. Typically used for authenticated write access to the repository
- Port: Port number
- User: The username used for authentication
- Password: The password used for authentication
- Store in Secure Store: Whether the password is saved in the Eclipse secure store
Click Next.
The Branch Selection screen will display branches available in the repository.
If you have multiple repositories, select the one which contains your project.
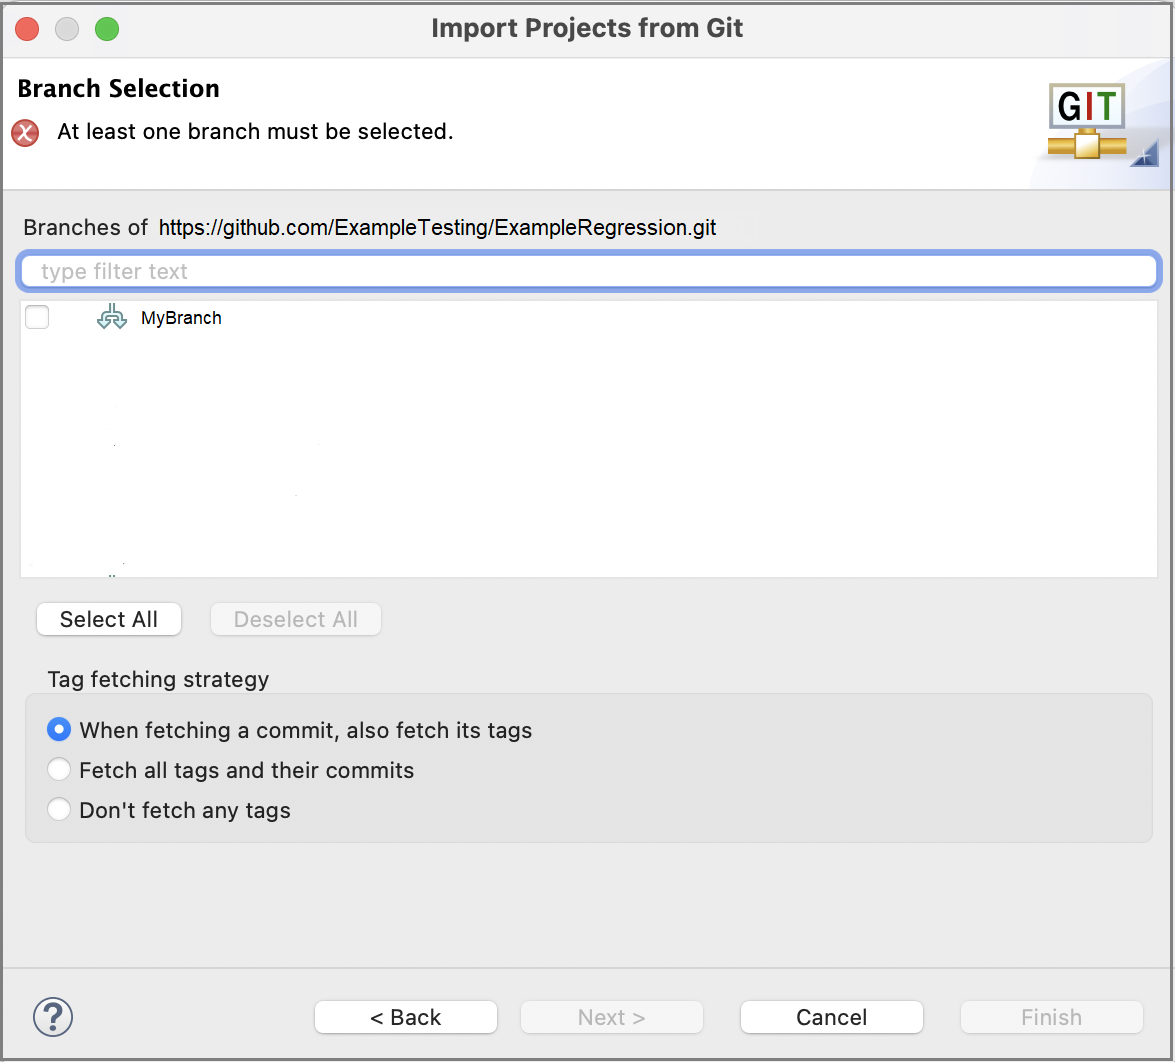
Click Next.
Click Browse to select the workspace.

Click Next.
The following screen will display the project for import.
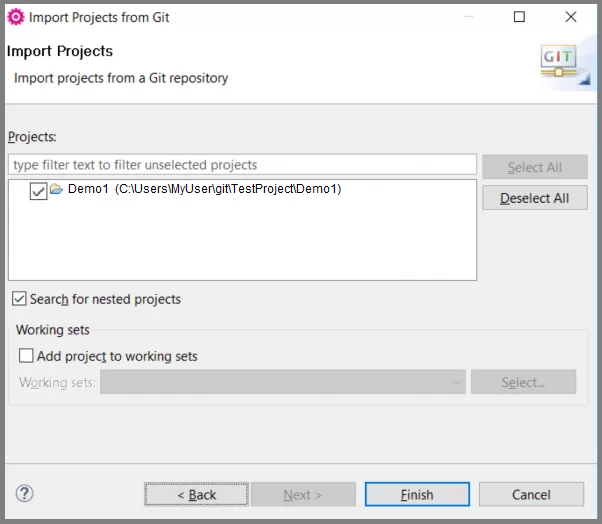
Click Finish to import the project.
Option 3: Linking a local project to Git
To link a local Project to Git, you must first have created a Project in Automation which can be pushed to Git. (Refer to Creating and Importing Projects for information on how to do this.)
Once you have a Project ready to be linked, right-click on the Project Name in the Navigator, then select Team > Share Project.
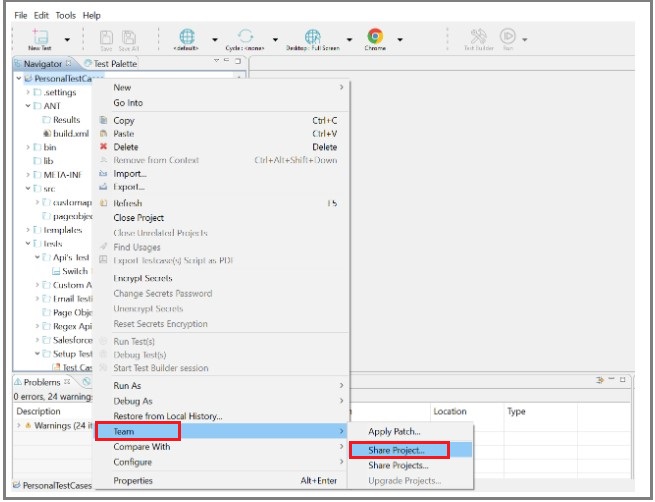
A Share Project screen is displayed as shown below. Select the repository type and click Next.

Browse a path for the repository field.

Click Finish.
Right-click on the Project and select Team > Commit.

Select the files you want to commit in the next screen and add comments.
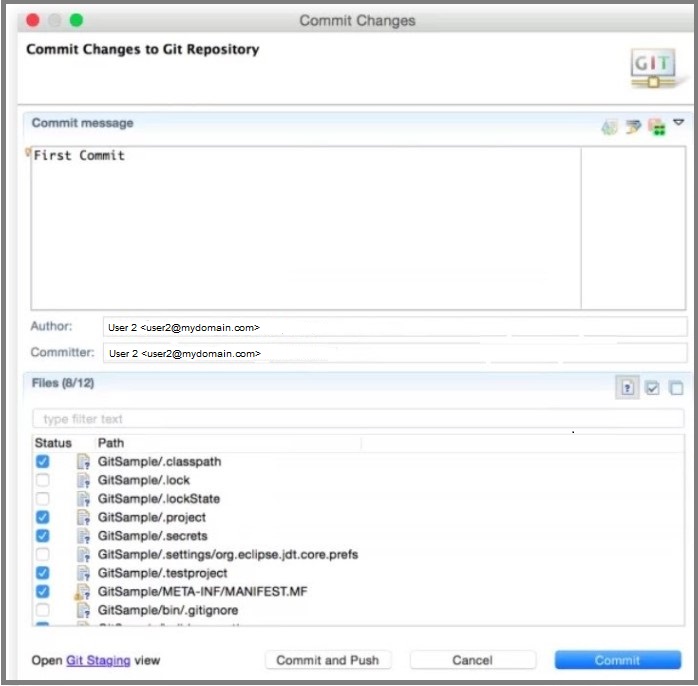
Click Commit.
Right-click on Project and select Team > Push Branch ‘master.’
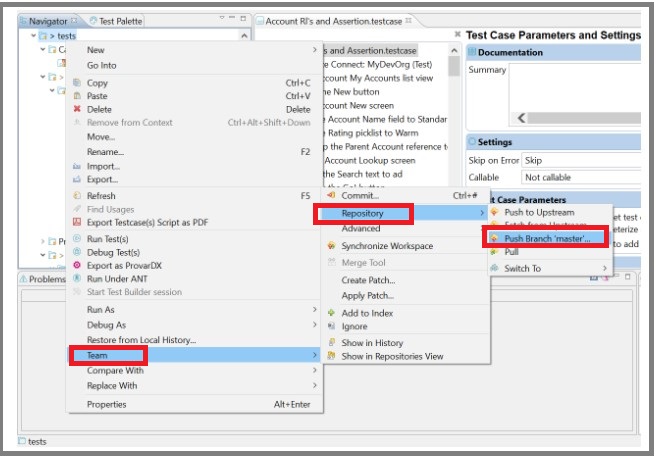
Enter the repository URL, User, and Password.

Click Next.
On the next screen, enter your chosen branch (it should be ‘master’ in this case), select the Force Overwrite check box.
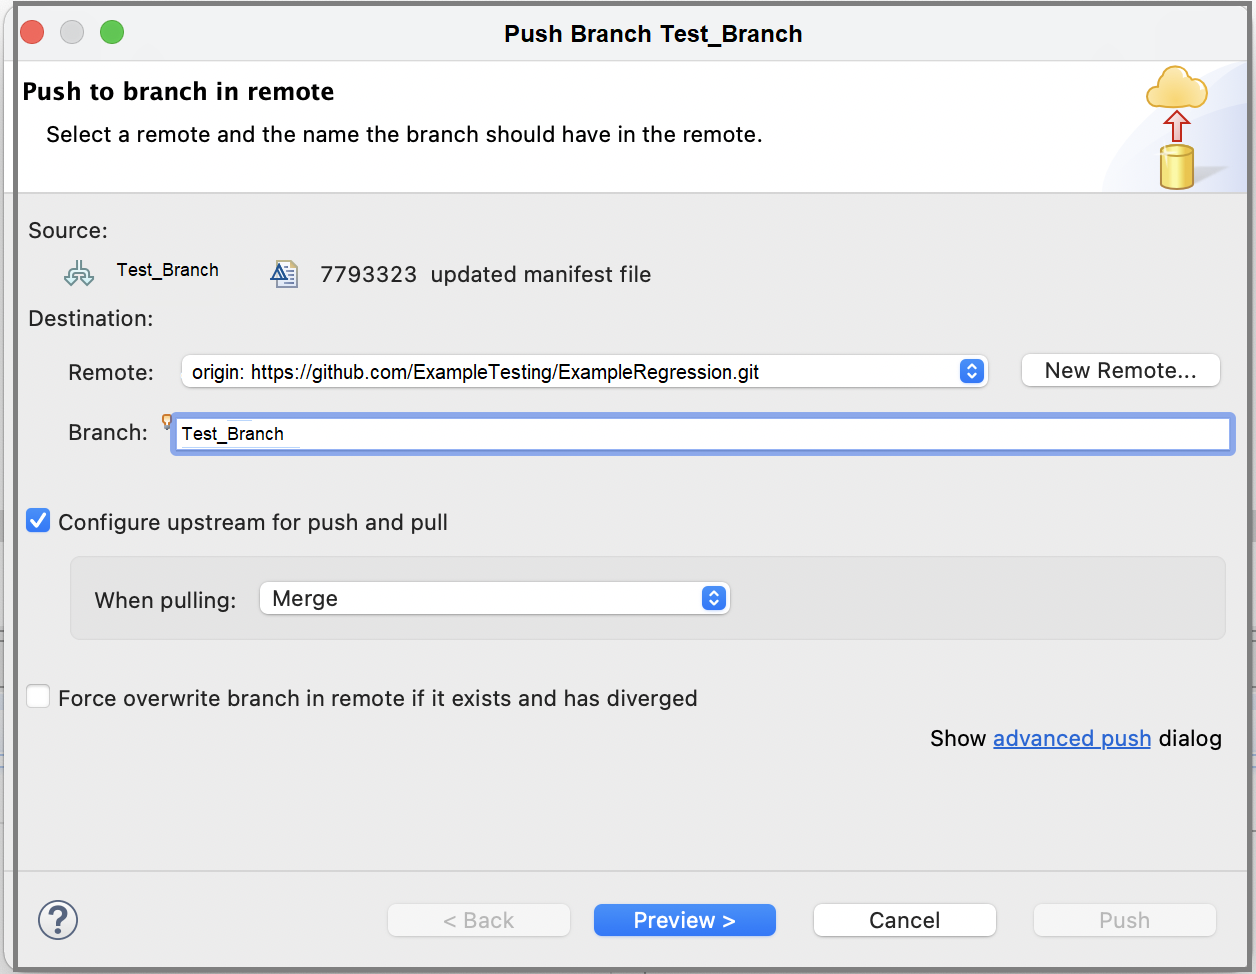
Note: Since the Force Overwrite checkbox is selected, this push will overwrite any files on the remote branch that conflict with the ones you are pushing. This option is, therefore, not recommended for use in general workflow as there is a risk of losing work. Please refer to Pull Requests and Resolving Conflicts for better practice in resolving conflicts.
Click Next.
On the next screen, review the details of the push you will make.
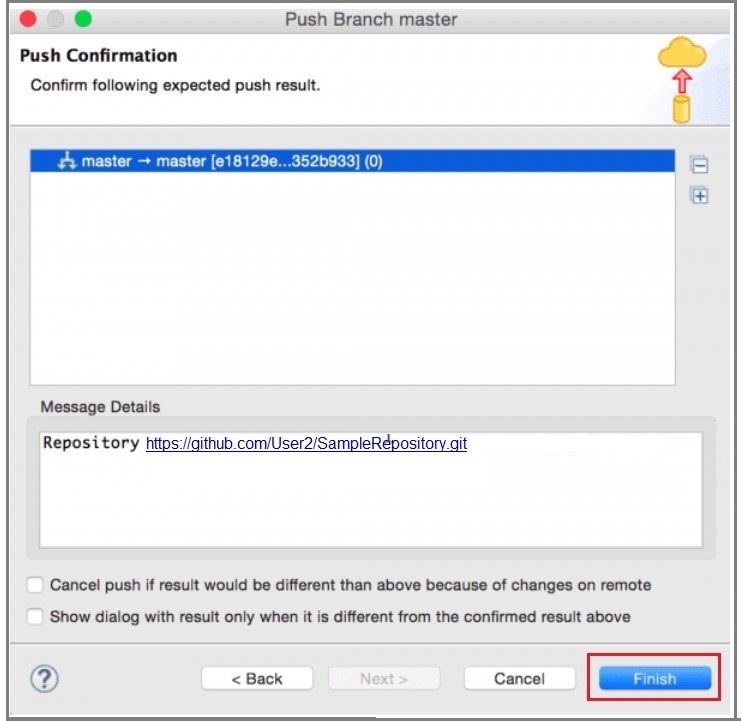
To confirm the push, click Finish.
Committing work
Once changes have been completed, the work should be committed and pushed to the repository.
To commit work, right-click on the Project in the Navigator view, then select Team > Commit…

This will display the following screen.

Enter a Commit message, select your files, and then choose Commit and Push or Commit.
Pushing commits
All committed tasks need to be pushed to the repository.
To push your committed work, right-click on the Project in the Navigator view, then select Team > Repository > Push Branch [BranchName]…:

This will display the following screen.
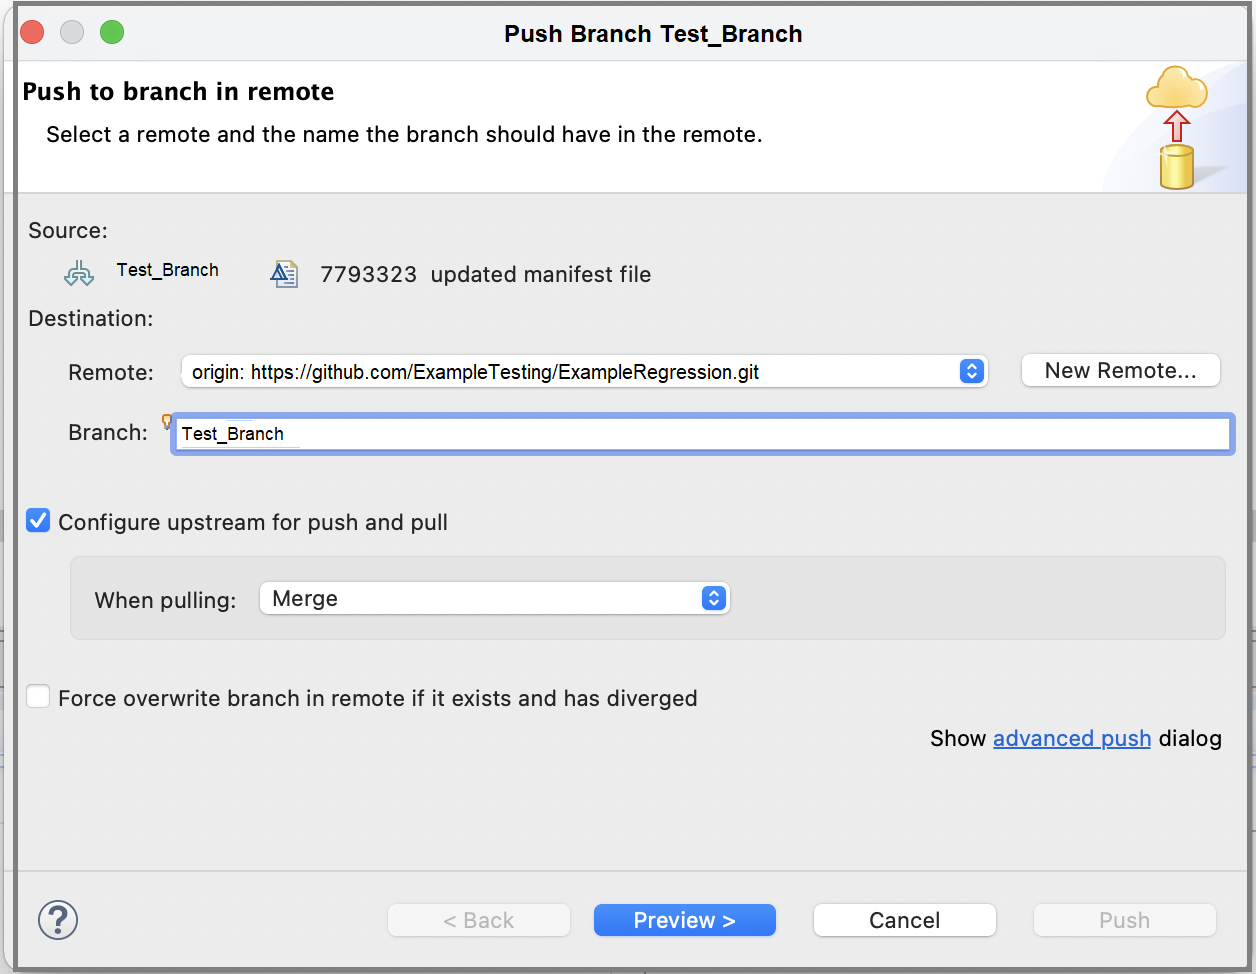
Specify your preferred settings and click Next.
This will display a Push Confirmation screen.
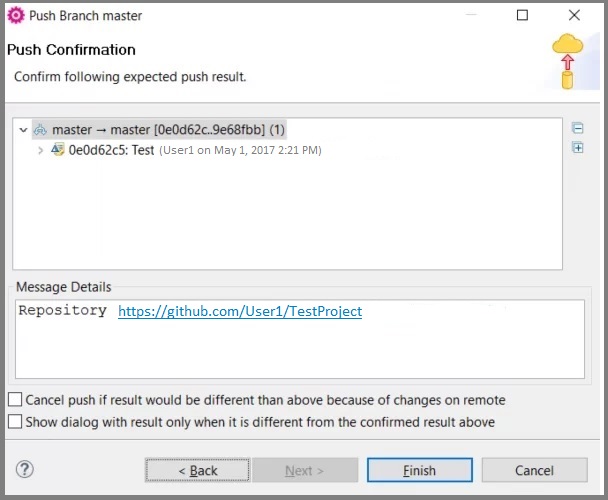
Click Finish to push to the repository.
The results are displayed as given below.
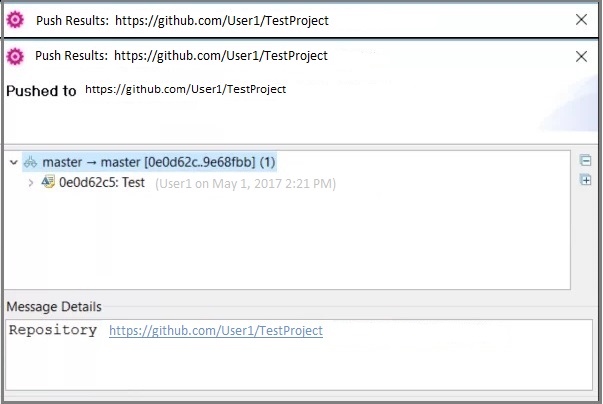
Click OK to finish.
Once you have your project sorted, refer to Working with Git for more best practices on using Git with Provar.
- Provar Automation
- Installing Provar Automation
- Updating Provar Automation
- Using Provar Automation
- API Testing
- Behavior-Driven Development
- Creating and Importing Projects
- Creating Test Cases
- Custom Table Mapping
- Functions
- Debugging Tests
- Defining a Namespace Prefix on a Connection
- Defining Proxy Settings
- Environment Management
- Exporting Test Cases into a PDF
- Exporting Test Projects
- Override Auto-Retry for Test Step
- Managing Test Steps
- Namespace Org Testing
- NitroX
- Provar Automation
- Provar Test Builder
- Refresh and Recompile
- Reintroduction of CLI License Check
- Reload Org Cache
- Reporting
- Running Tests
- Searching Provar with Find Usages
- Secrets Management and Encryption
- Setup and Teardown Test Cases
- Tags and Service Level Agreements (SLAs)
- Test Cycles
- Test Plans
- Testing Browser Options
- Tooltip Testing
- Using the Test Palette
- Using Custom APIs
- Callable Tests
- Data-Driven Testing
- Page Objects
- Block Locator Strategies
- Introduction to XPaths
- Creating an XPath
- JavaScript Locator Support
- Label Locator Strategies
- Maintaining Page Objects
- Mapping Non-Salesforce fields
- Page Object Operations
- ProvarX™
- Refresh and Reselect Field Locators in Test Builder
- Using Java Method Annotations for Custom Objects
- Applications Testing
- Provar Manager
- How to Use Provar Manager
- Provar Manager Setup
- Provar Manager Integrations
- Release Management
- Test Management
- Test Operations
- Provar Manager and Provar Automation
- Setting Up a Connection to Provar Manager
- Object Mapping Between Automation and Manager
- How to Upload Test Plans, Test Plan Folders, Test Plan Instances, and Test Cases
- Provar Manager Filters
- Uploading Callable Test Cases in Provar Manager
- Uploading Test Steps in Provar Manager
- How to Know if a File in Automation is Linked in Test Manager
- Test Execution Reporting
- Metadata Coverage with Manager
- Provar Grid
- DevOps
- Introduction to Provar DevOps
- Introduction to Test Scheduling
- Apache Ant
- Configuration for Sending Emails via the Automation Command Line Interface
- Continuous Integration
- AutoRABIT Salesforce DevOps in Provar Test
- Azure DevOps
- Running a Provar CI Task in Azure DevOps Pipelines
- Configuring the Automation secrets password in Microsoft Azure Pipelines
- Parallel Execution in Microsoft Azure Pipelines using Multiple build.xml Files
- Parallel Execution in Microsoft Azure Pipelines using Targets
- Parallel execution in Microsoft Azure Pipelines using Test Plans
- Bitbucket Pipelines
- CircleCI
- Copado
- Docker
- Flosum
- Gearset
- GitHub Actions
- Integrating GitHub Actions CI to Run Automation CI Task
- Remote Trigger in GitHub Actions
- Parameterization using Environment Variables in GitHub Actions
- Parallel Execution in GitHub Actions using Multiple build.xml Files
- Parallel Execution in GitHub Actions using Targets
- Parallel Execution in GitHub Actions using Test Plan
- Parallel Execution in GitHub Actions using Job Matrix
- GitLab Continuous Integration
- Travis CI
- Jenkins
- Execution Environment Security Configuration
- Provar Jenkins Plugin
- Parallel Execution
- Running Provar on Linux
- Reporting
- Salesforce DX
- Git
- Team Foundation Server
- Version Control
- Masking Provar Credentials on CI
- Salesforce Testing
- Best Practices
- Salesforce Connection Best Practices
- Improve Your Metadata Performance
- Testing Best Practices
- Automation Planning
- Supported Testing Phases
- Provar Naming Standards
- Test Case Design
- Create records via API
- Avoid using static values
- Abort Unused Test Sessions/Runs
- Avoid Metadata performance issues
- Increase auto-retry waits for steps using a global variable
- Create different page objects for different pages
- The Best Ways to Change Callable Test Case Locations
- Working with the .testProject file and .secrets file
- Best practices for the .provarCaches folder
- Best practices for .pageObject files
- Troubleshooting
- How to Use Keytool Command for Importing Certificates
- Browsers
- Configurations and Permissions
- Connections
- DevOps
- Error Messages
- Provar Manager 3.0 Install Error Resolution
- Provar Manager Test Case Upload Resolution
- Administrator has Blocked Access to Client
- JavascriptException: Javascript Error
- macOS Big Sur Upgrade
- Resolving Failed to Create ChromeDriver Error
- Resolving Jenkins License Missing Error
- Resolving Metadata Timeout Errors
- Test Execution Fails – Firefox Not Installed
- Selenium 4 Upgrade
- Licensing, Installation and Firewalls
- Memory
- Test Builder and Test Cases
- Release Notes